Client configuration is a many-leveled beast,
consisting of operating system tasks such as installing protocols,
application tasks such as choosing or coding to a specific Application
Programming Interface (API), provider, or driver, and maintenance tasks
such as configuring network settings, building connection strings, and
so on. The following sections cover a broad range of these tasks,
focusing on the most common. Many examples utilize TCP/IP both because
it is the default protocol for remote clients and because it is the most
widely used.
The first client configuration tool we look at is SSCM.
Client Configuration Using SSCM
The
Client Network Utility available prior to SQL Server 2005 has been
decommissioned, and all its functionality is now built into SSCM. This
includes the capability to create server aliases, to enable and
prioritize network protocols, to control the various SQL Server
services, and more.
Note
One thing Microsoft is keen on including in Books Online is that neither Setup nor sqlncli.msi
installs the actual network protocols themselves, nor do they enable
them at the operating system level. This means that if you do not have
TCP/IP installed and you need to start using it, you have to first set
it up by using the Network Connections Control Panel applet (if you’re
using Windows, that is).
You can launch SSCM directly from its Start menu icon, or you can access it in the Services and Applications
node of the Computer Management console. When you have SSCM up and
running, to access its client-side functionality, you expand its
top-level node (SQL Server Configuration Manager (servername)) and then you click the SQL Native Client 10.0 Configuration node. Below it, you click the Client Protocols node to reveal the enabled state and priority order of each protocol, in grid format, in the right pane (see Figure 1).

From this screen, you can
right-click any of the protocols to change their enabled state, view
Properties pages, or change the default connection order (except that of
shared memory, which is always tried first and whose order cannot be
changed). The following is the default connection order for clients
connecting without the benefit of a server alias, connection string, or
other means:
Shared memory
TCP/IP
Named pipes
(As the grid shows, VIA is
disabled by default.) When you are connecting remotely, TCP/IP is the
first protocol attempted because shared memory is local only.
Note
When a client does not
specify a connection protocol, SNAC automatically tries each protocol in
the list in sequence, according to the Order column. The first protocol
to connect successfully wins.
If the winning connection is subsequently rejected by the server for any reason, no other protocols are tried.
Note also that local
clients using MDAC 2.8 or lower cannot connect using shared memory, and
they are automatically switched to named pipes if they attempt to do so.
Let’s examine one of the
protocols. To start, you need to double-click TCP/IP under the Name
column to open the TCP/IP Properties screen (see Figure 2).
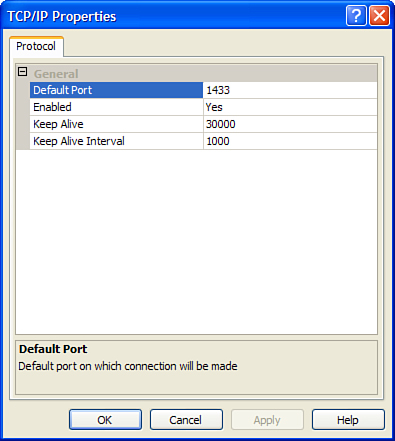
The values stored here are
used by TCP/IP clients as default connection values, and they are
applied only when a specific server alias or other configuration
mechanism is not in use. They are also used by the SQL Server 2008
client tools when shared memory is not available.
As
you can see, the default port, 1433, is set up to connect to the more
commonly configured default instances of SQL Server. By editing the
values on this page, you can change the default port number, enabled
state, keep-alive values, and other settings (when editing other
protocols). You should edit and enable the protocols according to your
specific needs.
Server Aliases
A server alias
is a name that is used like a server name that represents a group of
server settings for use by connecting clients. Server aliases are very
handy because of the way they simplify connection parameters: clients
need only specify the alias name, and SNAC pulls the rest of the
information (such as the IP address, TCP port number, and pipe name)
from SSCM at connection time.
To create a server alias, you right-click the Aliases node under SQL Native Client Configuration and choose New Alias. On the Alias - New screen that appears (see Figure 3), you specify the alias name, protocol (except shared memory, for which you cannot create an alias), and server name. (local, ., and localhost also work for local connections over TCP/IP or named pipes.)
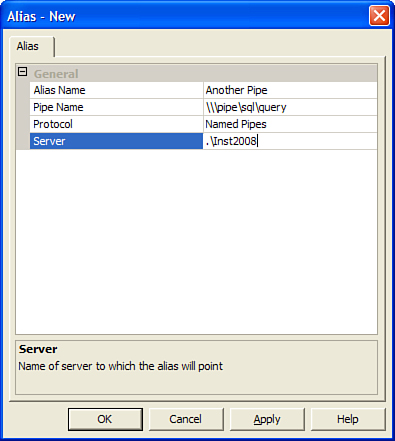
When you make your protocol
selection, the grid rows change to dynamically reveal the settings
particular to that protocol. When you are finished, you click OK, and
your alias is ready for use.
Connection Encryption
With
SQL Server 2008, it is easy to set up Secure Sockets Layer (SSL)
encrypted client/server communication over all protocols. The SNAC
net-library handles the tasks of encryption and decryption on both the
server and client ends. (Note that this process does cause a slight
decrease in performance.) Setting it up requires both server-side and
client-side configuration changes; this section covers only the
client-side changes in detail.
SQL Server 2008 enables encryption using two types of certificates:
The bit strength of the
encryption (40-bit or 128-bit) depends on the bit strength of the
operating systems of the computers involved in the connection.
To set up the server for
encryption, your administrator registers a certificate on the server
operating system (using the Certificates Management console) and then
installs it in the Database Engine.
If an externally
signed certificate is not installed on the server, SQL Server uses its
built-in self-signed certificate. (A server administrator may also
create and save a self-signed certificate by using SQL Server 2008 via
the new CREATE CERTIFICATE and BACKUP CERTIFICATE T-SQL syntax.) It is also up to the server to decide whether encryption is required or optional for connecting clients.
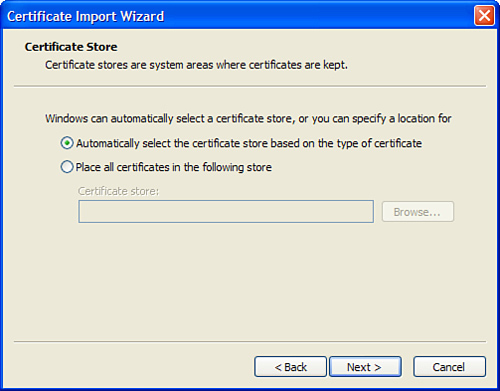
The client’s half of the job is to have installed what is known as a root-level certificate
that is issued by the same certification authority as the server’s
certificate. To install a root-level certificate, you right-click the
certificate itself (a .cer or .crt
file) and select Install Certificate to launch the Certificate Import
Wizard. You click Next on the welcome screen to reach the Certificate
Store screen (see Figure 4).
Then you select the first radio button (Automatically Select the
Certificate Store) and then click Next. Finally, you click Finish.
Next, you launch SSCM, right-click the SQL Native Client 10.0 Configuration node, and then select Properties. The Flags tab appears (see Figure 5) in the Properties window.
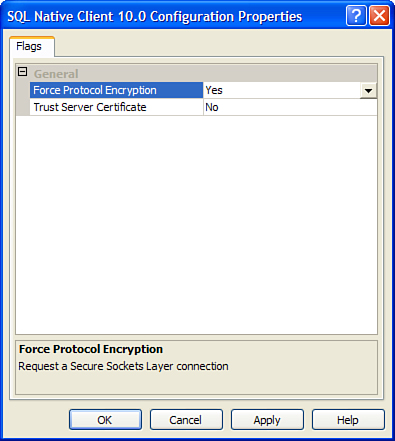
You set the Force Protocol Encryption property value to Yes.
This causes clients to request an SSL-encrypted connection when
communicating with the Database Engine. If the server does not respond
in kind, the connection is killed.
The Trust Server Certificate property gives clients a choice in how they deal with server certificates:
To use a self-signed certificate, you set the property value to Yes. This option prevents SNAC from validating the server’s certificate.
To use an externally signed certificate, you set the property value to No, which causes SNAC to validate the server’s certificate.
SSMS can also
connect over an encrypted connection. When connecting using the Connect
to Server dialog, you click the Options button and then click the
Connection Properties tab. Then you choose your database and protocol
and, at the bottom left, check the Encrypt Connection check box.